Showing posts with label Tips/Tutorials. Show all posts

Tuesday, June 17, 2008

I Admit....

I'm a sentiment junkie! Anyone else out there?? I have tons of newly released sentiments from StarvingArtistamps. See how nicely deep-etched these are? The new release is awesome, and there is something for everyone!! Heidi worked with Tracey , and they came up with the majority of these, as well as many of the SA design team. These sentiments came to me in sheets, and I used EZ mount thin with them. I cut each set out, but decided to wait on cutting each separate sentiment.

Next, I stamped reference sheets for quick identification. After I trim them out, I will store these sentiments in my Little Monkeys Store More Stamps system. (See the review for this system at Splitcoaststampers here.) I'm sure my cutters callous will grow, but it'll be worth it!!


Thanks for your visit, and have a super nice day!!

Monday, June 9, 2008

Riley's Fishin'

I hope you all had a nice weekend! We had some hot and stormy weather here, and didn't do too much. The boys only have a few days of school remaining, then it will be extra busy around here!

I have a busy day ahead of me today myself, so I'll have to keep this short.

Image ©Hanna Stamps

This card uses a Riley image that I received from my sweet friend, Wendy at WeeBeeStampin. I used Beate's WSC51 for the layout (altered slightly). The colors are quite different than my norm, and I wanted to use a little designer paper. I couldn't find any in the colors I was looking for, so I decided to use my Cuttlebug folders (from Eclectic Paperie) instead. I used my Karen Foster Snap stamps for the sentiment.

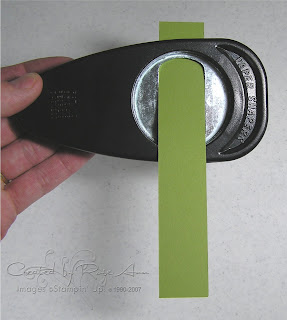
I have been making these little "flag" sentiments for my cards quite frequently, so I thought I would show you all how I like to punch the end with my square punch. Quick and easy!!


I have a super special and gorgeous RAK to share with you tomorrow, so be sure to check back if you'd like to see it! Thanks for visiting, and have a wonderful day!!


Stamps: Fishing Riley (Hanna Stamps), Mini Casual Snap-Stamps (Karen Foster)
Card Stock: Real Red, More Mustard, Taken with Teal, GP White
Ink: Black, VersaFine Onyx Black, Copic Sketch markers, Spica Glitter pen (clear)
Accessories: Tiny Bubbles & d'vine Swirl Cuttlebug embossing folders, ¾ inch square punch, Real Red Striped Grosgrain ribbon (SU)

Friday, May 30, 2008

Ready to weave?

Are you ready for that promised ribbon weaving tutorial? This is the card I made using the weaved ribbon from my tutorial. The big flower is from my Le Jardin set (Lizzie Anne Designs). I colored it with my Copic markers, and the center has Crystal Effects. I also highlighted this with my clear Spica glitter pen, but it's difficult to see in the photo. The sentiment is from Celebration Sayings (LAD). The Swiss Dots Cuttlebug (Eclectic Paperie) layer is Berry Sorbet from PTI and both of the ribbon colors are from PTI as well.


I will give you the full recipe of the card, then you may scroll down for the tutorial.

Stamps: Le Jardin, Celebration Sayings (Lizzie Anne Designs)
Card Stock: Basic Black, Georgia Pacific White, Berry Sorbet
Ink: Adirondack Pitch Black, Copic Sketch markers, Clear Spica Glitter pen
Accessories: Swiss Dots Cuttlebug folder, Scalloped Circle Nestabilites, Big Shot, Berry Sorbet & Sweet Blush 5/8 inch grosgrain ribbon, Sweet Blush Twill Tape, Word Window & Small Oval punches (SU), Crystal Effects, Scor-Tape, Dotto, Stampin' Dimensionals, Glue Dots


Ribbon Weaving Tutorial

Supplies:
2 x 3¼ inch piece of card stock
3- 5 inch strips of 5/8 inch ribbon
5- 4 inch strips of 5/8 inch ribbon
¼ inch Scor-Tape (Red liner will work as well)
Dotto
Scissors

**Please note--You may use shorter strips of ribbon, but I like to have a little extra to hold onto. The size of your card stock may be adjusted to suit your project. Make adjustments as needed.


Step 1: Adhere a strip of ¼ inch Scor-Tape to upper edge (2 inch side), of card stock.


Step 2: Peel the liner, and apply the 5-inch strips of ribbon along the edge of your Scor-Tape.


Step 3: Adhere another strip of Scor-Tape along the full length of the right edge of card stock .


Step 4: Peel the liner, and apply the 4-inch strips of ribbon along the edge. (Be sure to keep the strips tight together).

Step 5: Turn the card stock over so that your shorter lengths of ribbon are on the left side, and apply Dotto to the lower edge of the card stock. (This temporary adhesive will help secure your long ribbon strips while you are weaving).


Step 6: Turn card stock over again, and apply a strip of Scor-Tape to the remaining 3 ¼ inch side of the card stock.

Step 7: Begin weaving ribbon. Secure the long lengths to the Dotto as you weave, and the short lengths to the Scor-Tape, peeling the liner as you go.


Step 8: Trim the ends of short ribbon lengths, then apply a strip of Scor-Tape to the remaining short side of the card stock.

Step 9: Secure the long ribbon strips to the Scor-Tape, and trim the ends.


Step 10: Your completed weaving.

I hope you have fun with this! If you decide to give this a try, feel free to leave a link here! :D

Have a wonderful weekend everyone!! Thanks for stopping by!!

Monday, February 4, 2008

Awards


Fran from Franticstampers has tagged me for the Great Tip Award. Thanks, Fran!! Check out Fran's blog to see all of her awesome goodies by clicking the link above.

My tip is for all of you who would like an easy on-the-go watercoloring idea. Instead of having to haul out your ink pads or re-inkers...try this:

  • Grab your markers and Aqua Painter, and your stamped image ready for coloring.
  • You can use any non porous surface to scribble on for your "palette". I usually use my SAMJ sheet or the clear stamp case from my stamps.
  • Scribble the colors on your non-porous surface.
  • Watercolor lighter colors first using a light wash....and add more color in the desired areas to get the look you want. When I'm done coloring with my Aqua Painter, I usually outline directly with my marker.


Isn't it cool that you can just grab your whole marker case, and have all of those colors right at your finger tips? It doesn't get much easier than that, does it? ;)


I was also awarded this "Spread the Love Award" by Kathleen at My Happy Place, and Dawn at Treasure Oiler Designz. Both of these ladies spread the love all over blogland, and I always appreciate them spreading the love here as well!! Be sure to check out their blogs to see all the fabulous goodies they create. You won't be sorry. ;) Thanks for the tags ladies, and sorry it took me so long to post.

I'm taking a cop-out on the tagging. If you're reading this...consider yourself tagged. And if you have a tip to share, please let me know so I can check it out (I'm sure everyone else will appreciate it too!)

I have another tag to get to later, and a beautiful RAK to share. I will either post that later today, or tomorrow (once I get my list figured out....lol).

Thanks for visiting!!

Thursday, November 8, 2007

Flap Card Tutorial

I had a few people request dimensions for my card that I posted a couple of days ago, so I decided to give you a tutorial. How does that sound?


Supplies: 3½ x 11 card stock
3¼ x 4 patterned paper
3¼ x 4 White for Vanilla card stock
stamps/ink, card stock for stamping and matting your image
Coluzzle Cutting System with circle template
Scor-Pal or scoring tool of choice
Paper Cutter
BasicGrey magnetic snap closures or similar product
Any punches, ribbon, and or embellishments you desire


Take your 3½ x 11 piece of card stock, and use your Coluzzle Cutting System with your circle template to cut the curve using the most outer channel.


Trim the straight side of your card stock to measure 10 3/8 inches total length. After cutting, re-check your measurements. Your distance from where the curve begins, to the straight edge should measure 9 ½ inches. Make adjustment as necessary.


Score your card stock at 4¼ and 8½ inches using your Scor-Pal or other scoring tool.


Fold on scores and adhere the designer paper to the lower flap as shown.


Stamp, color, and mat your image, and adhere it to the top flap using Stampin' Dimensionals.


Use BasicGrey magnetic snap closures (or similar product) on the back of your image, and on the base of your card stock as shown.


Adhere your 3¼ x 4 inch white or vanilla card stock to the base of your project, to cover the snap.


Use any ribbon and/or embellishments to finish.


I hope you have fun with this! Please let me know if you make one, so I may check it out.

Thanks for visiting, and have a nice day!!

Stamps: Merry & Bright, Holidays & Wishes
Card Stock: Old Olive, Real Red, Watercolor, Very Vanilla, Dashing
Ink: StazOn Jet Black, Old Olive, Real Red, Pumpkin Pie, River Rock
Accessories: Scor-Pal, River Rock Double-Stitched Ribbon, 1 3/8 Circle Punch, Scallop Circle Punch, Coluzzle Cutting System, Aqua Painter, Stampin' Dimensionals

Thursday, August 2, 2007

Priceless Marigold


Marigold Morning was one of my favorite 'In Colors' from last year's SU collection. I really love it combined with Real Red, and Old Olive. The stamps are from the new Priceless stamp set, and the sentiment is from Short & Sweet. I created the "belt" by cutting a 1" strip of Old Olive, and feeding one end of it through my Key Tag Punch to create the rounded edge. I was thinking of adding some faux stitching to the photo corners, but my DH says the card is busy enough. What do you think?


Thanks for visiting my blog today!

Stamps: Priceless, Short & Sweet
Card Stock: Old Olive, Marigold Morning, Real Red, Whisper White
Ink: Real Red, Old Olive, White Signo Gel Pen, Stardust Gelly Roll Pen
Accessories: Crafter's Tool Kit, Key Tag Punch, Photo Corners Punch, Real Red Button, Karen Foster Scrapper's Floss, Tombo Mono Multi Glue, Stampin' Dimensionals & Glue Dots

Tuesday, July 24, 2007

Photo Cube Tutorial


A few people wanted to know how to make the photo cube I posted a few days ago, so I made this tutorial. Please keep in mind that this is my first tutorial....so go easy on me. Ha, ha! I used my cube as a photo display, but I know many of you could really get scrappy with these...and make some really awesome projects. Please feel free to share them if you make anything. I'd love to see them.


You will need a 12 x 12 sheet of sturdy card stock, and a cutter with a scoring blade. (Also any materials you are planning to use to decorate, of course).


Remove your cutting blade, and use your scoring blade to score at ½, 3¼, 6, 8¾, and 11½ inches.


Turn card stock so scored lines are horizontal, then score at 2¾, 5½, 8¼, and 11 inches as shown.


Install your cutting blade again, and cut along the scored line as shown.


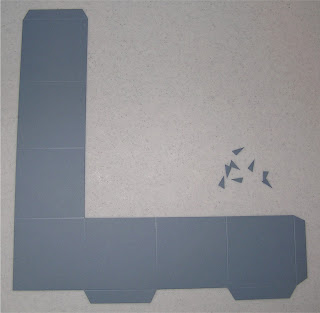
Trim along the scored area as shown in the picture, and remove the excess. (If you would like to be conservative, just don't score where you know the blank space is).


Trim off the areas that are marked in the picture.


Trim ½" off the flap as shown.


Trim the edges of the "tabs" as shown.


Bring the right side of the strip over to form the cube shape, and adhere with glue dots or sticky strip. If you are not planning to send in an envelope, bring the top flap around to finish the cube, (there will be some over lapping) tuck the flaps, and adhere with more glue dots or sticky strip. Decorate as you choose, and have fun!


Here is what the cube will look like when it's flattened for shipping. Just send some extra adhesive, so the receiver can form and secure the cube when it is received.